

maya: organic asset
today i decided to make my organic asset for my game. this is an important requirement for my assignment. i decided to make a plant inside a plant pot. I didn't want to make my plant look like a normal plant as the theme of the game is cyber punk and the level design is in a futuristic time.
i started off by wanting to create the plant pot and dirt to go with the plants. i started by adding a cube, then i used the 'scale tool' to drag to cube into a rectangle shape. i clicked ctrl c and ctrl v to duplicate what I had just created and then i used the 'move tool' and moved it above the rectangle.
after that, I then used the 'scale tool' again and scaled the first rectangle to a thinner version to make the right hand side of the plant pot. I then put that into place, duplicated that again using ctrl c and ctrl v, and used the 'move tool' and dragged it to the opposite side of the shape.
I once again duplicated it again and used the 'rotate tool' and turned it 90 degrees, then i used the 'move tool' to move it into place, and then i used the 'scale tool' to fit it properly into place. I duplicated that and repeated the process so that the plant pot was complete.
I then right clicked the mouse and used 'assign new material' and used 'lambert' and i added the colour blue to the plant pot. once my plant pot was finished, i then added a cube onto my plane and used the 'move tool' so that it was floating above the plant pot. I then used the 'scale tool' to drag it along to fit the plant pot length and then I used the 'move tool to adjust it so that it fit into place of the plant pot.
I then right clicked my mouse and then i used the 'assign new material' and i used 'lambert' and i added the colour brown to make it look more like dirt. i continued to make the dirt buy right clicking the mouse again and clicking the 'attribute editor' tab. i then went onto 'subdivisions height' so that i could drag parts of what i have just created to look more like dirt.
this is the final result

i started off by wanting to create the plant pot and dirt to go with the plants. i started by adding a cube, then i used the 'scale tool' to drag to cube into a rectangle shape. i clicked ctrl c and ctrl v to duplicate what I had just created and then i used the 'move tool' and moved it above the rectangle.
after that, I then used the 'scale tool' again and scaled the first rectangle to a thinner version to make the right hand side of the plant pot. I then put that into place, duplicated that again using ctrl c and ctrl v, and used the 'move tool' and dragged it to the opposite side of the shape.
I once again duplicated it again and used the 'rotate tool' and turned it 90 degrees, then i used the 'move tool' to move it into place, and then i used the 'scale tool' to fit it properly into place. I duplicated that and repeated the process so that the plant pot was complete.
I then right clicked the mouse and used 'assign new material' and used 'lambert' and i added the colour blue to the plant pot. once my plant pot was finished, i then added a cube onto my plane and used the 'move tool' so that it was floating above the plant pot. I then used the 'scale tool' to drag it along to fit the plant pot length and then I used the 'move tool to adjust it so that it fit into place of the plant pot.
I then right clicked my mouse and then i used the 'assign new material' and i used 'lambert' and i added the colour brown to make it look more like dirt. i continued to make the dirt buy right clicking the mouse again and clicking the 'attribute editor' tab. i then went onto 'subdivisions height' so that i could drag parts of what i have just created to look more like dirt, but i also right clicked and went onto 'vertex' mode and i then clicked the button 'b' to go onto soft mode so that i could get a more detailed illusion of dirt.
this is the final result

i then decided to add a polygon cone to the plane. this was so that i could begin making my futuristic plants which will help complete my organic asset.
after that, i used the 'move tool' to drag the polygon cone above my plant pot so that it would be easier for me to re-size the plants properly so that it would be easier to fit them into place later on.
i then decided to add a polygon cone to the plane. this was so that i could begin making my futuristic plants which will help complete my organic asset.
i used the 'attribute editor' tab and I went onto 'subdivisions height' just like i did earlier to make the dirt, but this time i was about to shape the plant.


after that, i then right clicked and clicked the 'vertex' mode and then i clicked the button 'b'to go onto 'soft select mode'.
this was so that i could further experiment with making more different and unique shapes. i then experimented with it until i created my futuristic plant.
i dragged the parts i wanted to move while using the 'soft select mode' and i dragged parts of the object to how i wanted until i was happy about how it looked.
i wanted it so that my plants looked unusual. i wanted it so that when people play on my level design and they see my plants, they will feel like that they are part of the environment that i have created.

i then used the 'scale tool' to squash the plant which i wanted to test out and see how it looked. I liked the way it looked. i wanted to try out different shapes and sizes to compare and see what i preferred.
i right clicked onto my mouse and used the 'assign new material' and then i added the 'lambert' material onto the plant and i added the colour red to the plant to complete the look.


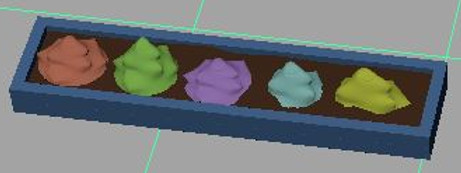
after that, i then used the 'move tool' to place the plant into the plant pot. i then clicked onto 'mesh' and then i clicked onto the 'combine' tab so that it all became one whole object. i then duplicated the plant (ctrl c and ctrl v) and i decided that i wanted to change the colours and shapes slightly.

i did this by duplicating the second flower and changing the shape by using the 'scale tool', and when i was happy with the look i then right clicked, went onto 'assign new material', added the material 'lambert' and changed the colour so that each time i created a plant the end result looked different.
problem solving
after i created my final product, i had a problem with my organic asset. the pivot would glitch and move away from the organic asset i was making so to fix this problem i clicked onto the 'modify' tab and clicked the 'centre pivot' tab which automatically moved it on top of the asset.
after i fixed the problem, i continued to finish placing my asset to my level design. i used the 'move tool' to move my organic asset to where i wanted it to be on my level design. i decided that i wanted it to sit on top of an archway as i wanted people to see it while looking at my level design.
i then used the 'scale tool' to shrink the plant so that it would fit into the archway. this made my plants grow in length but i liked the look even more after seeing the results like this. it made the plants look even more unusual which i liked.
you can see the final results below.
_JPG.jpg)

conclusion
i am happy with my results and i will keep my organic asset in my level design as i believe it makes my level design more appealing to people who will see my level design and i also believe that my organic asset will make my level design more interesting to explore.